Build a Dragon Fruit Trellis That Lasts 20 Years
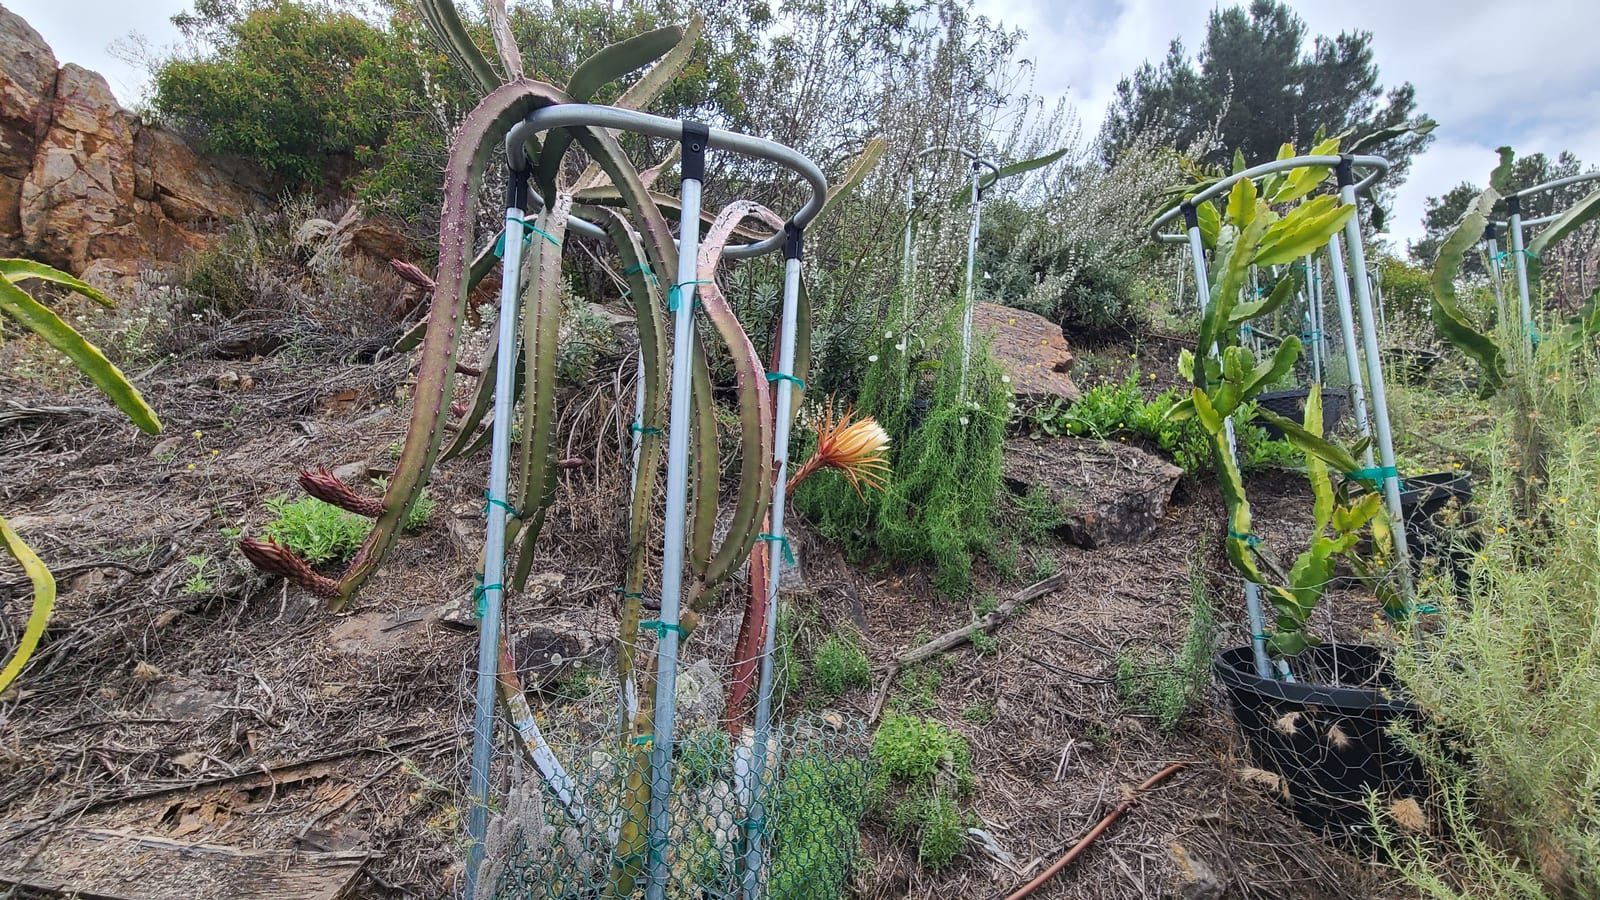
Build your dragon fruit trellis before you plant the cutting. This semi-epiphytic cactus lacks a self-supporting stem, so it relies entirely on external structure for its entire productive life. The framework must hold substantial biomass for twenty to twenty-five years. A rotting post or rusted wire means tearing out a healthy, fruiting planting. The trellis serves two distinct functions. It supports structural cladodes, which grow as a single vertical axis, and it holds production cladodes off the ground to bear fruit. Size the support for the mature canopy, not the small cutting you start with. An unmanaged vine produces roughly 130 cladodes by its fourth year. Choose a design that allows easy access for pruning and harvest while lasting as long as the crop.
The trellis options, side by side
Training systems fall into four families: single post, trellis, V-shape, and ladder.[1] Each handles biomass and access differently. The table below compares the main structures you will encounter. Note that regardless of design, the height where productive cladodes hang should not exceed 1.6 m to keep harvesting workable.[1]
| System | What it is | Typical material | Layout & Density | Durability | Best use |
|---|---|---|---|---|---|
| Single post (mop top) | Post with a ring or cap on top; cladodes hang over the edge.[1] | Concrete, wood, iron ring, or tyre.[1] | Single plant per post. Low density (e.g., 2,000-2,600 plants/ha).[1] | High if concrete; low if wood. | Small plots or hot climates where shade is needed.[1] |
| T-shape | Post with horizontal crossbar; wires strung between posts.[1] | Concrete or galvanised iron posts; galvanised pipes.[1] | Single or double row. High density (6,000-10,000 plants/ha).[5] | High. | Commercial rows needing easy access and high yield.[1] |
| A-shape | Inclined legs meeting at top; wires strung between frames.[1] | Galvanised iron frame, often with mesh.[1] | Double row (one line per leg).[1] | High. | Double-row plantings wanting structural stability.[2] |
| Vertical posts with arms | Post with multiple horizontal arms at different heights.[1] | Galvanised iron or steel.[1] | Single or double row.[5] | High. | Sites with existing berry infrastructure.[1] |
| V-shape (Tatura) | V-shaped frames perpendicular to row; wire between them.[1] | Galvanised steel.[1] | Double row (one line per side).[4] | High. | Maximizing aeration and light penetration.[1] |
| Ladder | Posts with horizontal rungs; plants tied between rungs.[1] | Bamboo.[1] | High density possible.[1] | Low; needs frequent replacement.[1] | Low-budget setups or temporary trials. |
| Live supports | Tall, slender tree carrying the cactus.[1] | Living tree.[1] | Variable; depends on tree spacing. | Depends on tree health and pruning.[1] | Tropical areas wanting natural shade and habitat.[1] |
| Two-tier (Vietnam novel) | Second fruiting layer above the first.[5] | Reinforced trellis structure.[5] | Higher vertical density.[5] | High if well-built. | Exploiting vertical space for higher yield.[5] |
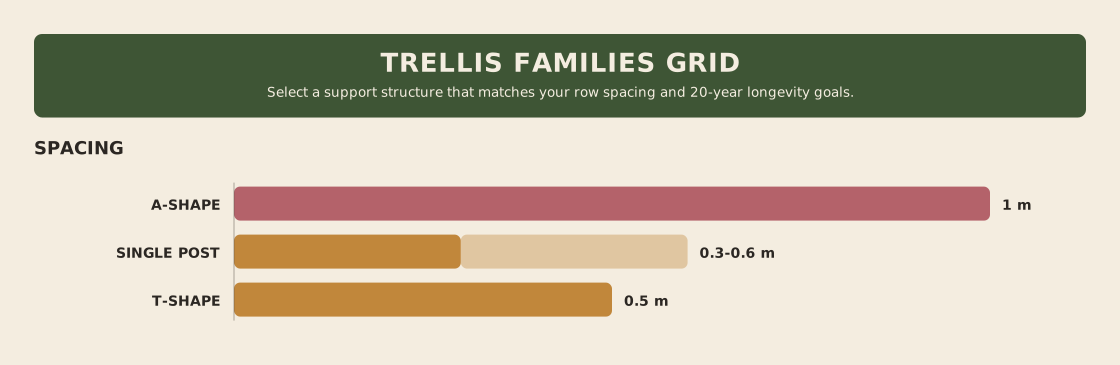
The horizontal T-bar wire trellis allows planting at 30-60 cm in the row, creating a plant wall that fruits on both sides.[5] This contrasts with the single post, where you work around individual plants.[1] While the T-bar has higher initial and upkeep costs, the increased yield and revenue often offset the expense.[5] In a field trial in Almeria, Spain, a two-dimensional trellis similar to a hedgerow curtain was used, with cladodes hanging from 1.8 m to form a production wall.[4] Note that this exceeds the 1.6 m general recommendation, likely due to specific site conditions or management style.
Density note: Wire trellis systems can support 6,000-10,000 plants per hectare, far exceeding the mop-top's typical 2,000-2,600 plants per hectare in many regions.[5] However, some mop-top configurations, like those in Israel, can reach higher densities (13,000+ plants/ha) with tight spacing, though this complicates access.
The V-shape or Tatura system offers a more open canopy than the A-shape, improving aeration and sunlight penetration.[1] This can be critical in humid climates where fungal issues are a concern. The ladder system, usually made of bamboo, is low cost and easy to install but is short-lived and rarely used commercially due to the need for frequent replacement.[1] Live supports provide natural shade and habitat for pollinators, but require regular pruning of the host tree to prevent excessive shade from cutting flowering and fruiting.[1]
For those considering a two-tier canopy, this approach exploits the crop's vigorous vegetative growth to create a second fruiting layer.[5] It shows promise for higher yield and sunburn management but demands extra structure, closer monitoring, and harder intercultural work.[5] The Vietnam novel system, which reports higher yield and fruit quality at lower production cost, is the published basis for this two-tier approach.[8]
Which one to build: one plant, or a row
The choice between a single post and a wire trellis row comes down to how many plants you intend to manage. For a home garden or a small plot, a simple T-shaped post is often the most practical starting point. Fairchild Tropical Botanic Garden uses supports approximately six feet tall to train their plants, removing lateral growth until the stems are well up the structure before inducing branching.[7] This setup handles the biomass of one or two plants effectively. In field experience from India, reinforced cement concrete poles of similar height, topped with a square or circular plate, can support three or four plants per pole.[5] While this mop-top style has low establishment costs, it limits plant population per unit area and makes pruning, spraying, and harvesting awkward because you must work around individual domes of foliage.[5]
A wire trellis row becomes worth the extra material and labor cost once you are managing six or more plants. The horizontal T-bar wire system allows for planting at 30-60 cm intervals in the row, creating a dense plant wall that fruits on both sides.[5] This design supports densities of 6,000-10,000 plants per hectare, far exceeding the 2,000-2,600 plants per hectare typical of many mop-top configurations.[5] The primary advantage is access. A trellis row lets you walk between the plants and reach the canopy from the side, whereas a single post requires you to reach over or around the entire dome. The increased yield potential and ease of maintenance in a row system generally offset the higher initial investment.[5]
The honest case against the trellis
Most guides push the wire trellis because it looks tidy and allows high-density planting. But if you are gardening in a hot, exposed site like Southern California, reconsider the wire trellis. The single post, often dismissed as the "beginner" option, is actually the defensible choice for heat management.
Two major trials highlight this discrepancy. In a greenhouse study in Antalya, Turkey, researchers compared pole, T, and inverted-U systems. The pole system yielded the most, at 5,625.3 kg/ha, beating the inverted-U (5,594.9 kg/ha) and the T-trellis (5,330.0 kg/ha).[3] The authors recommended the pole system first.[3]
The field data is even more stark. An open-field trial in India compared single poles against T-trellises. The single pole produced 61 t/ha of white-fleshed fruit, while the T-trellis managed only 28 t/ha.[6] The difference wasn't just about density; it was about stress. The T-trellis pushed vegetative spread hard, but the canopy temperature hit 43 C, causing photo-damage with a yellowing intensity of up to 3.88.[6] Bud retention fell, and yield dropped.[6] Red-fleshed varieties also performed best on the single pole, achieving optimal pulp yield and Brix levels only on that structure.[6]
Heat stress is the limiting factor
Wire trellises create a "plant wall" that exposes cladodes to direct sun on all sides. In hot climates, this leads to sunburn and reduced flowering. The single post allows the plant to form a dome, where the outer cladodes shade the inner ones. While self-shading can reduce fruit set in the center, it protects the plant from the lethal combination of high canopy temperature and water loss.
For a SoCal grower, the lever isn't just the structure; it's shade and row orientation. A single post is easier to shade with a temporary net or a nearby tree. Live supports, like tall slender trees, provide natural shade and habitat for pollinators, removing the need for artificial shade nets.[1] If you choose a wire system, you must manage the microclimate aggressively. North-south rows maximize light but increase sunburn risk.[2] In hot zones, east-west rows or partial shade may be necessary to keep canopy temperatures below the stress threshold.
Don't let the "commercial" look of a trellis row dictate your choice. If your site gets afternoon sun and high summer temperatures, the single post is not a compromise. It is the system that yields more fruit under heat stress.
Dimensions and materials that last as long as the planting
Your trellis is a permanent installation, not a temporary fixture. It must survive the full twenty to twenty-five year productive life of the dragon fruit. If the posts rot or the cables snap, you are forced to tear out a healthy, fruiting planting. Aim for a cost-effective structure that is easy to work inside for pruning and harvest, and that accepts the plant’s adventitious anchoring roots without fighting them.
Most commercial production areas, particularly in the Mediterranean basin, rely on galvanised iron posts connected by steel cables or wires. These wires are protected inside polyethylene tubing. This sleeve is not decorative. It prevents mechanical damage to the cladodes as they thicken and shift in the wind. Without it, the wire cuts into the stem, creating entry points for disease and stress.
When you build, you are sizing for the mature canopy, not the cutting you just planted. The working ceiling for production cladodes should not exceed 1.6 m. This keeps harvesting and pruning manageable. The table below lists the specific material standards that hold up over decades.
| Component | Material & Spec | Why it matters |
|---|---|---|
| Post | Galvanised iron or concrete. In mop-top practice, 5-6 ft RCC poles are common.[5] | Must support substantial biomass for 20+ years. Wood rots; untreated steel rusts. |
| Height | 1.5-1.8 m above ground. Working ceiling capped at 1.6 m.[1] | Keeps fruit within reach. Exceeding 1.6 m complicates harvest and pruning. |
| T-Arm | 0.25 m wide.[4] | Provides enough surface for wires without creating excessive shade or wind resistance. |
| Wires | Steel cable or wire, sleeved in polyethylene.[1] | PE sleeve prevents mechanical damage to stems as they thicken and move. |
| Top Cap | Concrete, metal, or a tyre.[1] | Carries the hanging cladodes. Must be durable and weather-resistant. |
Tie rule: Use twine or fabric bands to secure stems to the structure. Never use bare wire for ties. Dragon fruit stems get thick and heavy. Wire cuts into the tissue as it expands, damaging the plant and creating infection sites. The plant will eventually send out aerial roots that grip the support themselves, but the initial tie must be gentle.
Design for reinforcement. A structure that is easy to repair or strengthen is better than one that is cheap but fragile. The adventitious roots of the dragon fruit will anchor into the post and wire. If the material is too slick or too rough, it hinders this natural grip. Galvanised iron and concrete offer the right balance of durability and texture for the plant to hold on.
Spacing, density and plants per post
Density is a management decision, not just a layout choice. The table below shows how published spacing translates to plant populations across common systems. Note that mop-top density depends heavily on how many plants you place per pole, while wire trellis density is driven by row and in-row spacing.
| System | Spacing | Plants/ha | Notes |
|---|---|---|---|
| Mop top (USA) | 3.0 x 5.0 m | 2,001-2,668 | 667 poles/ha; 3-4 plants per pole |
| Mop top (India) | 2.5 x 3.0 m | 3,999-5,332 | 1,333 poles/ha; 3-4 plants per pole |
| Mop top (Israel) | 1.5 x 1.5 m | 13,332-17,776 | 4,444 poles/ha; 3-4 plants per pole |
| Wire trellis (Vietnam) | 5.0 x 0.60 m | 6,666 | Single row |
| Wire trellis (India) | 3.3 x 0.60 m | 9,642 | Double row |
| Wire trellis (India) | 3.3 x 0.46 m | 12,820 | Double row |
| Curtain (Spain) | 1.0 x 5.0 m | ~2,000 | 1.8 m hedgerow wall |
| T-shape (Spain) | 0.5 x 2.0 m | ~10,000 | 1.5 m high, single guyot |
These figures assume 3 to 4 plants per mop-top pole, a standard practice in field experience from India and Israel.[5] The wide range in mop-top populations reflects spacing choices, not a fixed rule. A 1.5 x 1.5 m grid packs 4,444 poles per hectare, but access for pruning and harvest becomes difficult at that density.[5]
Why over-packing backfires
An unmanaged dragon fruit vine produces roughly 30 cladodes in its first year, climbing to about 130 by year four.[5] That growth curve is the reason not to over-pack. Tangled cladodes yield smaller fruit with no increase in total harvest, because self-shading blocks light from reaching productive wood.[1] In a mop-top dome, only the 20 to 30 outermost cladodes produce fruit; the inner canopy contributes almost nothing.[4]
Do not confuse plant count with productive count. A 13,000 plants/ha mop-top planting may hold fewer fruiting cladodes than a 6,000 plants/ha wire trellis, because the trellis wall exposes more apical cladode tissue to light. Of 94 fruit in a trellis trial, 73 developed on the apical part of the cladode, 17 in the middle, and only 4 at the base.[4] Density that shades the apical zone wastes space.
Spanish trials illustrate the trade-off. A 1.0 x 5.0 m curtain at 1.8 m high gave a manageable wall, while a 0.5 x 2.0 m T-shape at ~10,000 plants/ha demanded aggressive pruning to keep the single guyot branch productive.[4] Both systems outperform a crowded mop-top on yield per unit of light, because the flat wall intercepts more sun than the dome.[4]
When you set spacing, plan for the mature canopy, not the cutting. A pole that looks bare in year one will be a shaded tangle by year four. Size your structure and your pruning schedule around the 130-cladode reality, and choose a density you can actually manage with your hands and your harvest buckets.
Setting the posts
Start with the end posts, which carry the tension of the entire wire system. Brace them firmly and align them precisely before digging the line posts; if the ends are out of square, the whole row will twist.
Drive or set your posts through the raised bed and into the firm subsoil below. Do not rely on the loose, mounded topsoil of the bed for stability. A post anchored only in the soft mound will lean or pull out once the plant reaches maturity. The raised bed exists to manage water, not to hold the structure.
Bed sizing matters for post depth. On light, sandy soils, a bed 5 to 6 feet wide and 0.5 to 1 foot high is sufficient. On heavy soils, build the bed 5 to 6 feet wide but 2 to 3 feet high to ensure drainage. In both cases, the post must penetrate past this loose material into the native ground.
Consider the root architecture when deciding how deep to set the posts. In mature plants, anchoring roots extend up to 1.5 meters both horizontally and vertically. About half of the root mass sits in the top 30 to 60 centimeters of soil. Your posts need to bypass this active zone and find purchase in stable ground beneath it. If the post is loose, the plant’s own root expansion can eventually destabilize the support.
Row orientation dictates the light exposure and the structural load. A north-south alignment maximizes solar exposure, which promotes vigorous vegetative growth and improves fruit development and coloration. However, this full sun exposure increases the risk of cladode sunburn, wind damage, and sudden temperature drops. In windy sites, a north-south row may catch more wind than an east-west row, placing greater lateral stress on the end posts. Adjust your bracing accordingly.
Site selection precedes post setting. The ground must be well-drained sandy loam with a pH between 5.5 and 6.5. Avoid heavy, waterlogged soils, as they compromise both the drainage bed and the post’s stability. Salinity above 4 dS/m can kill the plants outright, so test your soil before committing to a permanent structure.
Step-by-step build
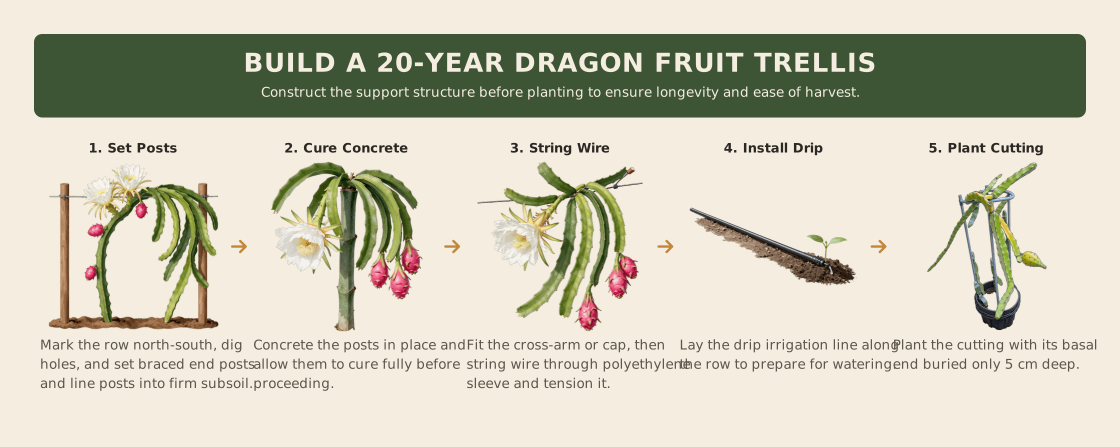
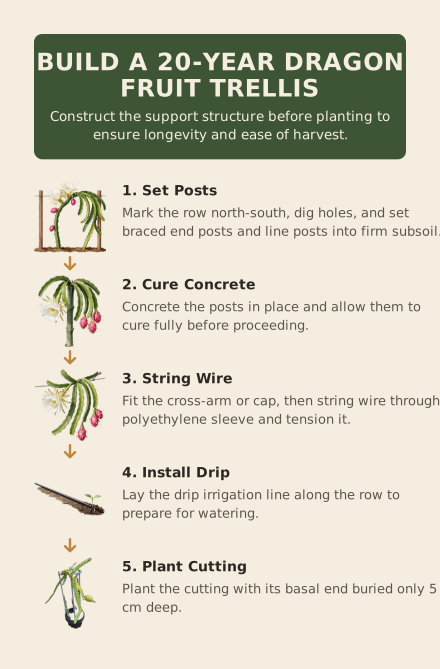
Start by marking the row and leveling the ground. North-south orientation maximizes solar exposure for better fruit development, though it increases the risk of sunburn and wind damage, so factor site conditions into your layout.[2] Once the line is set, install the end posts first. These must be robust enough to withstand the tension of the wire system for the twenty to twenty-five year lifespan of the planting.[1]
Next, set the line posts at your chosen spacing. For a T-shape or similar wire trellis, this often means a dense arrangement to support the high plant population.[5] Ensure each post is plumb and firmly anchored before moving on. If you are using a design with cross-arms or caps, attach them now. Galvanised iron is the standard for durability in these systems, resisting the rot that plagues wooden supports over time.[1]
With the frame standing, string the wire. Run steel cables or wires through the cross-arms or along the row. Sleeve these wires in polyethylene tubing. This protects the plant’s cladodes from mechanical damage and prevents the wire from cutting into the thickening stems as they grow.[1][7] Tension the wire until it is taut. A sagging wire will hold water and debris, inviting rot and making harvest difficult.
Lay the drip line before you plant. Designing irrigation into the trellis from the start is far easier than retro-fitting it later, and it ensures consistent water delivery to the root zone.[3] Finally, plant your cuttings. Cure them first so the wound heals, and bury the basal end only shallowly in well-drained soil.[1][7] Tie the young stems to the structure with twine or fabric bands, avoiding wire ties that can strangle the plant as it thickens.[7]
Training the plant onto the structure
Your trellis is built, but the plant is still a small, vulnerable cutting. The goal now is to turn that cutting into a single, strong column that reaches the top of your support. This phase determines the architecture of your harvest for decades, so handle it with care. Start by preparing the cutting correctly. If you have a fresh cutting, cure it in the shade for a week or more until the cut end is dry and calloused. This prevents rot when you plant it. When you are ready to plant, bury the basal end only up to 5 cm deep in a well-drained mix. Do not add gravel or pot shards to the bottom of the container; this raises the water table and keeps the roots soggy. Use a free-draining mix all the way down and ensure the pot has a drainage hole.
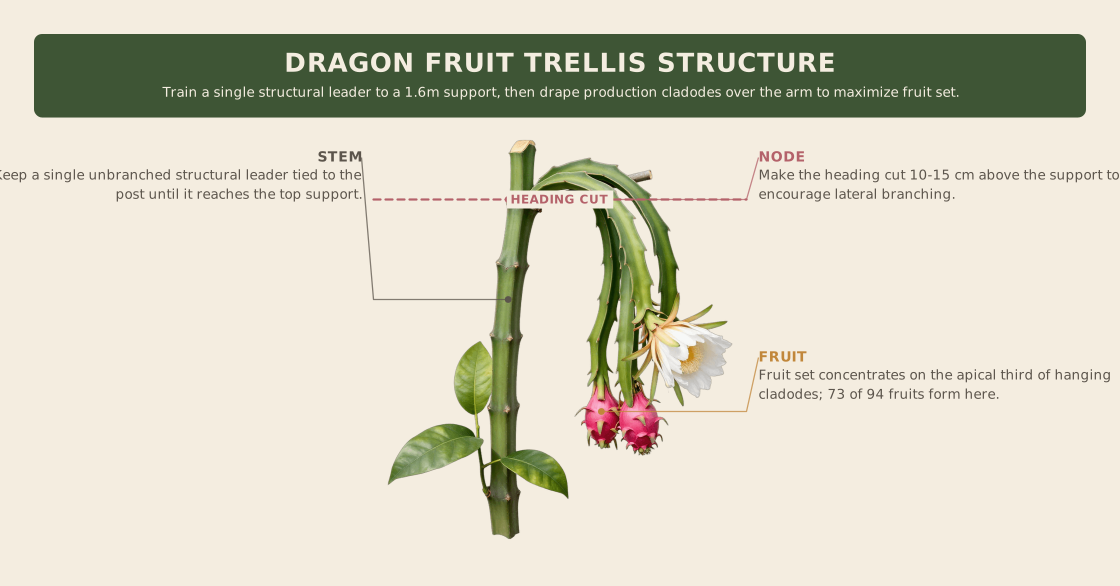
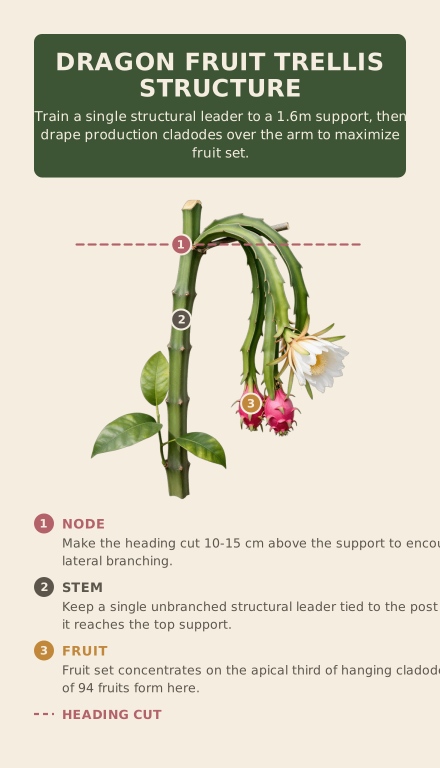
Once planted, keep the cutting in partial shade until it establishes roots. As it grows, it will send up a single vertical shoot. This is your structural cladode, the main trunk of the plant. Your job is to keep it straight and unbranched. As the shoot climbs, it will try to send out side shoots, or lateral cladodes. Remove these immediately using thinning cuts, which means cutting the lateral flush with the main stem rather than leaving a stub. Do this the whole way up the support. Leaving these laterals wastes the plant’s energy and creates a bushy, weak stem that cannot support the weight of the fruiting canopy later.
Never use bare wire to tie the stems. Dragon fruit stems thicken and become heavy. Bare wire cuts into the flesh, damaging the vascular system and often killing the branch. Use soft twine, fabric bands, or strips of old t-shirt. These materials stretch or can be loosened as the stem grows, protecting the plant’s health.
Guide the main stem up the trellis post or wire, tying it loosely at intervals to keep it upright. As the plant matures, it will send out aerial roots that grip the support themselves, but you must support the stem until those roots take hold. Continue removing any side shoots that appear below the top of your structure. You want a clean, single pole of green flesh reaching the height you designed for.
When the main stem reaches the top of the support, you have two choices to start the fruiting canopy. You can make a heading cut about 10-15 cm above the support structure. This cut stops vertical growth and forces the plant to push out new cladodes from just below the cut. Alternatively, you can bend the top of the stem over the support so it hangs downward. This also encourages new cladodes to emerge from the upper side of the bend. Both methods work; the choice often depends on your specific trellis design.
After the heading cut or bend, the plant will produce a cluster of new shoots. Do not let them all grow. Select a few well-distributed shoots that face different directions. These will become your production cladodes, the branches that hang down and bear fruit. Thin-cut out the rest. You want an open canopy that allows light and air to reach the fruiting zones. Crowded, tangled cladodes produce smaller fruit and invite disease. By selecting only the strongest, best-positioned shoots, you ensure that the plant’s energy goes into producing large, high-quality fruit rather than maintaining excess foliage.
Prune to a number, not a feeling
Pruning dragon fruit is not a creative act. It is a calculation. The goal is to match the number of fruiting stems to the light and space available, ensuring each cladode has the energy to push a heavy fruit. If you prune by eye, you risk leaving too much wood, which creates a tangled mess that shades itself, or cutting too hard, which starves the plant of its production capacity.
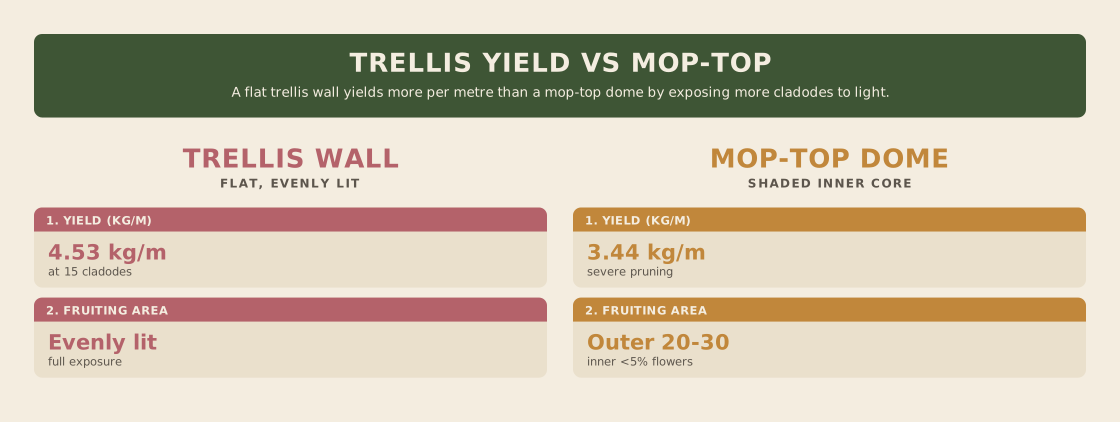
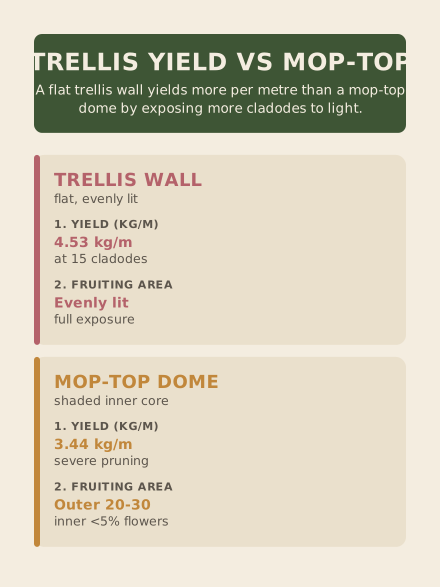
Field trials on trellis systems provide a clear target. Leaving 15 one-year-old cladodes per linear metre of production wall resulted in the highest yield, hitting 4.53 kg per linear metre. This beats the severe pruning treatment of 6 cladodes per metre, which yielded only 3.44 kg per metre. The difference is substantial. Severe pruning costs you more than 1 kg of fruit per linear metre outright, and it does not improve fruit set or size to compensate.[4]
There is a threshold where quantity stops helping quality. A treatment leaving 12 cladodes per metre produced the same number of fruits as the 15-cladode treatment, but the individual fruits weighed less. This suggests that while the plant can initiate flowers on 12 stems, it cannot support them to full weight. The extra three stems in the 15-cladode system provide the necessary photosynthetic capacity to fill the fruit. Overcrowding beyond this point does not increase yield; it just creates smaller fruit. Tangled cladodes block light and air, leading to inferior fruit with no gain in total harvest weight.[4]
Size matters as much as count. Cladodes between 40 and 60 cm show the highest probability of flowering and set more fruit per stem. Anything under 20 cm should be removed. These small stems rarely flower, and when they do, the fruit is inferior. Removing them directs the plant’s energy toward the robust, mature wood that actually pays the bills.
Where the fruit sits on the stem also dictates how you prune. In trellis trials, 73 of 94 fruits developed on the apical part of the cladode. Only 17 formed in the middle, and just 4 at the base. This is why cane pruning, which tips only the apical bud, works better than spur pruning. It encourages the plant to push growth from the tips, where the fruiting potential is highest. Draping cladodes over a wire ensures these apical zones are exposed to light and air, rather than buried in the canopy.[4]
The geometry of your support changes the math. A flat trellis wall is more light-efficient than a mop-top dome. In a central-leader mop top, self-shading is difficult to avoid. Only the 20 to 30 outer cladodes produce fruit, while the inner third of the canopy sees less than 5% of flower formation. No more than 60% of flowers form in the outer part of the canopy. This is why entangled cladodes in a mop top must be removed aggressively; they are dead weight that blocks light to the few productive stems on the outside.
If you are using single posts, the conversion is different. The most productive pruning level for a mop top is 50 cladodes per pole. This number accounts for the spherical distribution of light and the need to keep the center open. Use these specific counts as your baseline. Adjust slightly for vigor, but do not deviate far. Pruning to a number ensures you are harvesting the maximum weight the plant can support, rather than guessing at what looks tidy.
Climate limits and failure modes
A trellis is not just a support structure; it is a microclimate modifier. The open geometry of a T-bar or V-shape exposes the canopy to the elements in ways a dense mop-top does not. Before you drive the first post, assess your site’s extremes. Frost is the primary killer. Pitaya tolerates down to -2 C, but -4 C is lethal[2]. If your site sees hard frost, an open-field trellis row is a risky gamble. Heat is the secondary constraint. While the plant survives up to 40 C with adequate water, temperatures above 38 C inhibit flowering[2]. In hot climates, an exposed trellis can push canopy temperatures to 43 C, causing severe photo-damage and yellowing[6].
Wind and rain also dictate layout. Strong nocturnal winds blow pollen out of the flowers, cutting pollination efficiency[2]. Excessive rain causes floral abscission and fruit rot[2]. Row orientation matters here. North-south rows maximize solar exposure for growth and color, but this same exposure increases the risk of sunburn and sudden temperature drops[2]. If you are in a windy or wet zone, consider windbreaks or adjust your row orientation to shield the flowers during their single night of bloom[2].
| Symptom | Cause | Structural or Siting Fix |
|---|---|---|
| Plant death | Frost below -4 C[2] | Avoid open-field trellis; use pots or protected structures. |
| No flowers | Heat above 38 C[2] | Add shade cloth or choose a system with more canopy cover. |
| Yellowing cladodes | Canopy overheating (43 C)[6] | Use a two-tier canopy for self-shading or switch to mop-top. |
| Root rot | Waterlogging | Build raised beds; ensure posts do not trap water. |
| Stunted growth | Salinity above 4 dS/m[2] | Test soil; avoid coastal sites with poor drainage. |
| Poor fruit set | Nocturnal wind blowing pollen[2] | Install windbreaks; orient rows to block prevailing night winds. |
| Fruit rot | Excessive rain on flowers[2] | Improve air circulation; consider a roofed structure. |
If your site is marginal for an open trellis, you have options. A two-tier canopy can provide self-shading to manage sunburn, though it requires more structure and monitoring[5]. Alternatively, you might consider growing dragon fruit in pots if you would rather not commit to a trellis row. Potted plants can be moved to shelter during frost or extreme heat, bypassing the fixed limitations of an open field.
Check your frost line. If your site sees temperatures below -2 C regularly, an open trellis is likely to fail. Frost kills the plant at -4 C[2].
Annual maintenance on a trellis row
Once the structure is built and the plants are established, the work shifts from construction to management. A trellis row is a long-term investment, and its productivity depends on a strict annual rhythm of pruning, inspection, and irrigation management. Neglecting any of these elements degrades the canopy, stresses the plants, and ultimately reduces yield.
Timing is critical for maintenance pruning. The optimal window falls between the end of harvest and the emergence of new growth. In many production climates, this corresponds to late autumn or early winter. Delaying pruning into the spring reduces sprouting vigor, exposes tender new shoots to heat stress, and shortens the time available for cladodes to mature before the next fruiting cycle.[1]
The goal of maintenance pruning is renewal, not just reduction. You are replacing old fruiting wood with vigorous new shoots. Identify healthy basal shoots emerging from the base of older production cladodes. Select the strongest ones and stimulate their growth by making a drop-crotch cut on the parent cladode, just above the chosen shoot. This directs energy into the new branch. Remove non-structural, diseased, or overcrowded cladodes using thinning cuts to open the canopy.[1]
One effective protocol, tested in commercial trials, involves topping the main stem when it reaches 180 cm to force lateral branching. Retain four to five well-distributed side branches in the first year. Once those branches extend to 1 m, cut back their tips to induce fruit set. Throughout the growing season, perform ventilating clears three times a year. These cuts remove thick, dried, or tangled branches that block light and air, preventing the canopy from becoming a dense, unproductive thicket.
Physical inspection of the trellis itself is just as important as pruning the plants. Wires stretch under the weight of biomass and weather. Check tension annually and tighten as needed. Inspect polyethylene sleeves or protective tubing on wires for chafing, which can damage cladodes and create entry points for disease. Look for post lean, especially after storms or heavy fruit loads. A leaning post compromises the entire row’s stability and may require bracing or replacement before it fails completely.
Finally, remember that irrigation is part of the structure’s function, not an afterthought. Field trials have shown that deficit irrigation can outperform full irrigation in yield. In one study, plants receiving 75% of standard water requirements produced 7,169.6 kg/ha, compared to 5,783.9 kg/ha for those with full irrigation.[3] This suggests that water delivery must be precise and integrated into the trellis design from the start. Retrofitting drip lines into an established row is difficult and often inefficient. Install emitters or drip tape along the base of each post or row during construction, ensuring uniform coverage that supports the canopy’s water needs without waterlogging the root zone.
Pro tip: Keep a log of your pruning dates and wire tension adjustments. Dragon fruit is a perennial crop that will stay in the ground for decades. A record of when you topped plants or replaced sleeves helps you spot patterns in plant health and structural wear before they become critical failures.
What to build if you have three plants
Three plants is a tricky number. It is too many for a single mop-top post to support comfortably without crowding, but too few to justify the engineering effort of a commercial T-bar row. The most practical solution for a home grower is a short, sturdy T-shape segment or a pair of posts connected by a horizontal arm. This gives each plant its own vertical axis while allowing the production cladodes to hang freely on both sides.
Field trials suggest that density does not always require massive infrastructure. One study tested plants on a T-shaped structure only 1.5 m high and 0.25 m wide, trained as a single guyot with one main branch from the trunk. These plants were spaced 0.5 m in the row and 2.0 m between rows, achieving a density of about 10,000 plants per hectare[4]. For your three plants, you can mimic this compact footprint. Use two posts set 2.0 m apart with a crossbar at 1.5 m. Plant your three cuttings in a line between the posts, spaced 0.5 m apart. Tie each stem to a stake until it reaches the wire, then let it drape over.
Where the evidence stops. The trial data above comes from controlled agricultural settings with specific irrigation and pruning regimes. Home growers rarely replicate the precise pruning to a single guyot or the exact irrigation schedules used in those trials. Expect your canopy to be bushier and your harvest timing to vary. The structure will hold the weight, but your yield will depend on your local climate and care, not just the geometry of the trellis.
If you are growing in containers rather than in the ground, the rules change slightly. A three-plant cluster in pots can be grouped around a central support or a short trellis segment. Fill the pot with a single, free-draining mix all the way down and ensure there is a clear drainage hole.
For those in warmer, frost-free zones, this compact trellis setup works well outdoors year-round. If you are in a region with cold winters, you may need to move potted plants indoors or provide heavy protection. Our guide to growing dragon fruit in pots covers the specific soil mixes and overwintering strategies needed for container plants. If you are located in Southern California, where microclimates vary significantly, check our Southern California guide for advice on site selection and sun exposure specific to that region.
References
- Pitaya as a New Alternative Crop for Iberian Peninsula: Cultural Practices (Trindade A.R., Matias P., Lacerda V., Pestana M., Marques N., Duarte A.) - Plants 15(5):807, section 4 Training and Pruning, Plants (MDPI); Universidade do Algarve, MED/CHANGE. Full text extracted from the MDPI PDF (2026).
- Pitaya as a New Alternative Crop for Iberian Peninsula: Biology and Edaphoclimatic Requirements (Trindade A.R., Paiva P., Lacerda V., Marques N., Neto L., Duarte A.) - Plants 12(18):3212, Plants (MDPI); Universidade do Algarve, MED/CHANGE. DOI metadata verified via Crossref (2023).
- Prospects of training system and deficit irrigation for increasing yield and water use efficiency of pitaya (Hylocereus spp.) in the Mediterranean region (Kaman H., Gubbuk H., Altinkaya L., Balkic R., Unlu M.) - BMC Plant Biology 25:1431; Pole vs T vs Inverted-U greenhouse trial, Antalya 2018-2021, BMC Plant Biology (Springer Nature). Full text extracted from the Springer PDF (2025).
- Determining Optimal Levels of Pruning in Hylocereus undatus [(Haw.) Britton and Rose] in Trellis Systems (Chiamolera F.M., Parra L., Sanchez E., Casas M., Hueso J.J., Cuevas J.) - Agronomy 13:238, Agronomy (MDPI); Universidad de Almeria, Dept. of Agronomy, and Cajamar Experimental Station. Full text extracted from the MDPI PDF (2023).
- Dragon fruit cultivation in new areas: challenges, management strategies, and insights from India (Kakade V.D., Morade A.S., Salunkhe V.N. et al.) - Discover Agriculture 3:168, incl. Table 2 dragon fruit spacing and plant population by system and country, Discover Agriculture (Springer Nature). Full text extracted from the Springer PDF (2025).
- Canopy management in two dragon fruit species through training systems for sustainable fruit production (Karunakaran G., Kanupriya C., Arivalagan M., Laxman R.H., Kumar P., Manjunath B.L., Ruchitha T., Abhilash K., Tunc Y., Khadivi A.) - Scientia Horticulturae 355:114545; single pole vs pyramid stand vs T-trellis on white and red cultivars, Scientia Horticulturae (Elsevier). Abstract and biblio retrieved via Crossref/OpenAlex (2025).
- Dragon Fruit: Surprisingly Easy to Grow (Kenneth Setzer) - Fairchild Tropical Botanic Garden, as published in the Miami Herald 26 July 2014, Fairchild Tropical Botanic Garden, Miami, Florida (2014).
- Novel trellising and plant management techniques for dragon fruits in Vietnam (Truc L.T.H., Son N.V., Long N.N., Hoa N.V., Campbell J.M., Fullerton R.A.) - Dragon Fruit Regional Network Initiation Workshop; also published in Dragon Fruit - From Production to Market, FFMC, Taipei, 2021, pp. 183-194, Food and Fertilizer Technology Center for the Asian and Pacific Region (FFMC). DOI metadata verified via Crossref (2018).