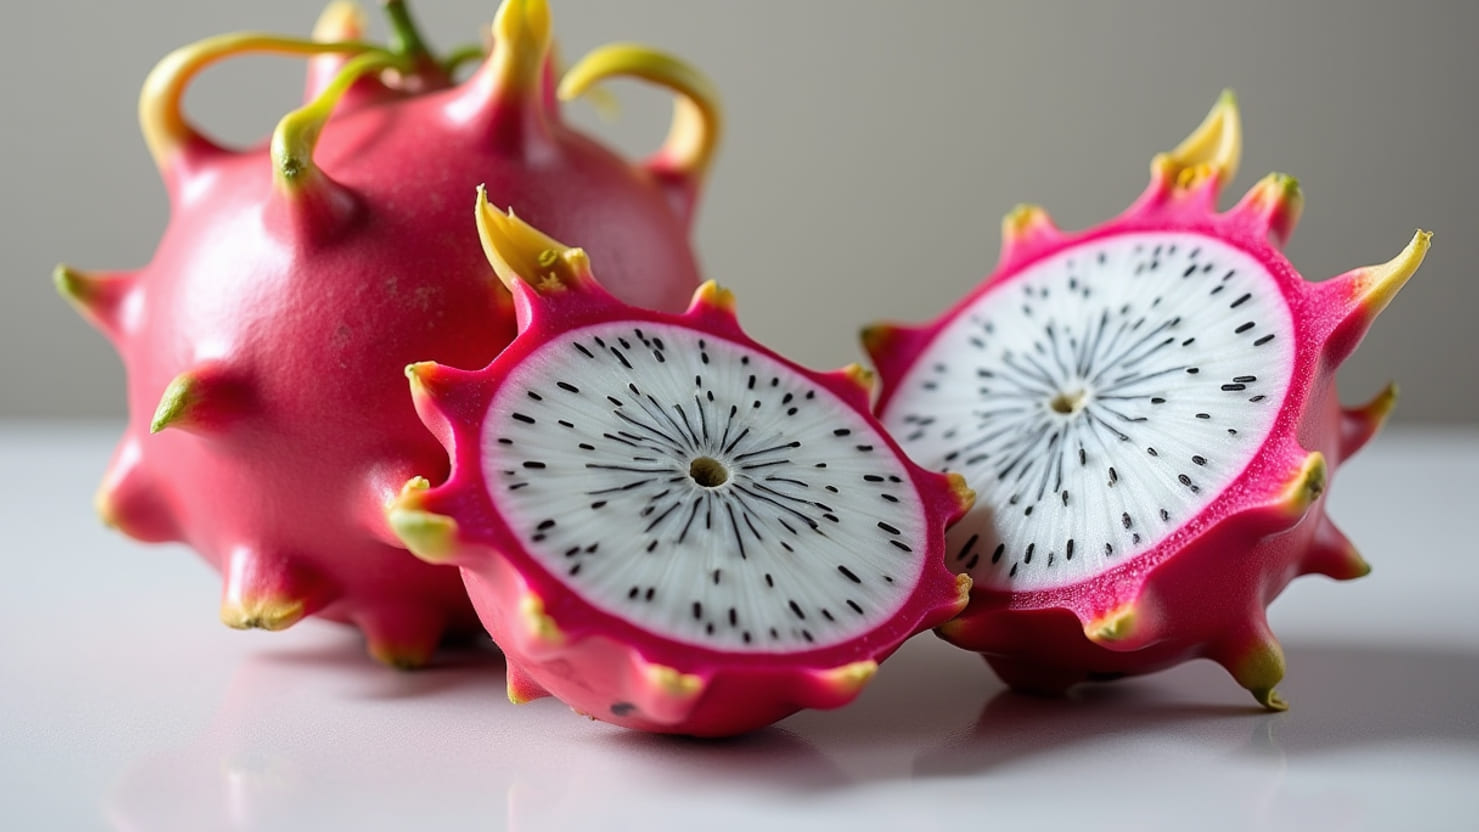
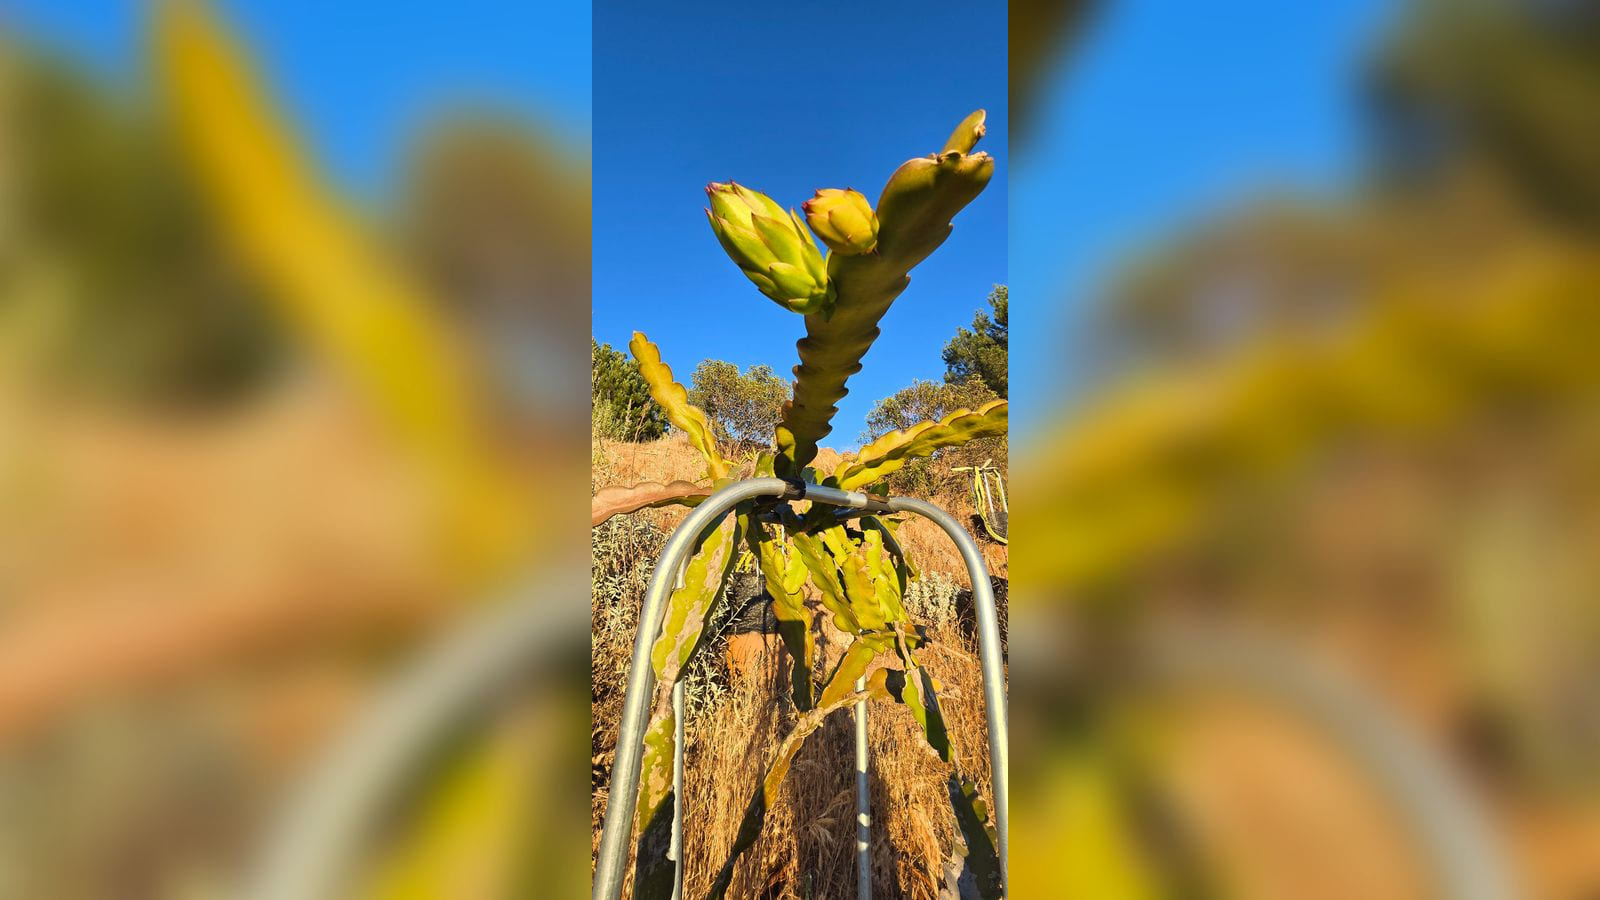
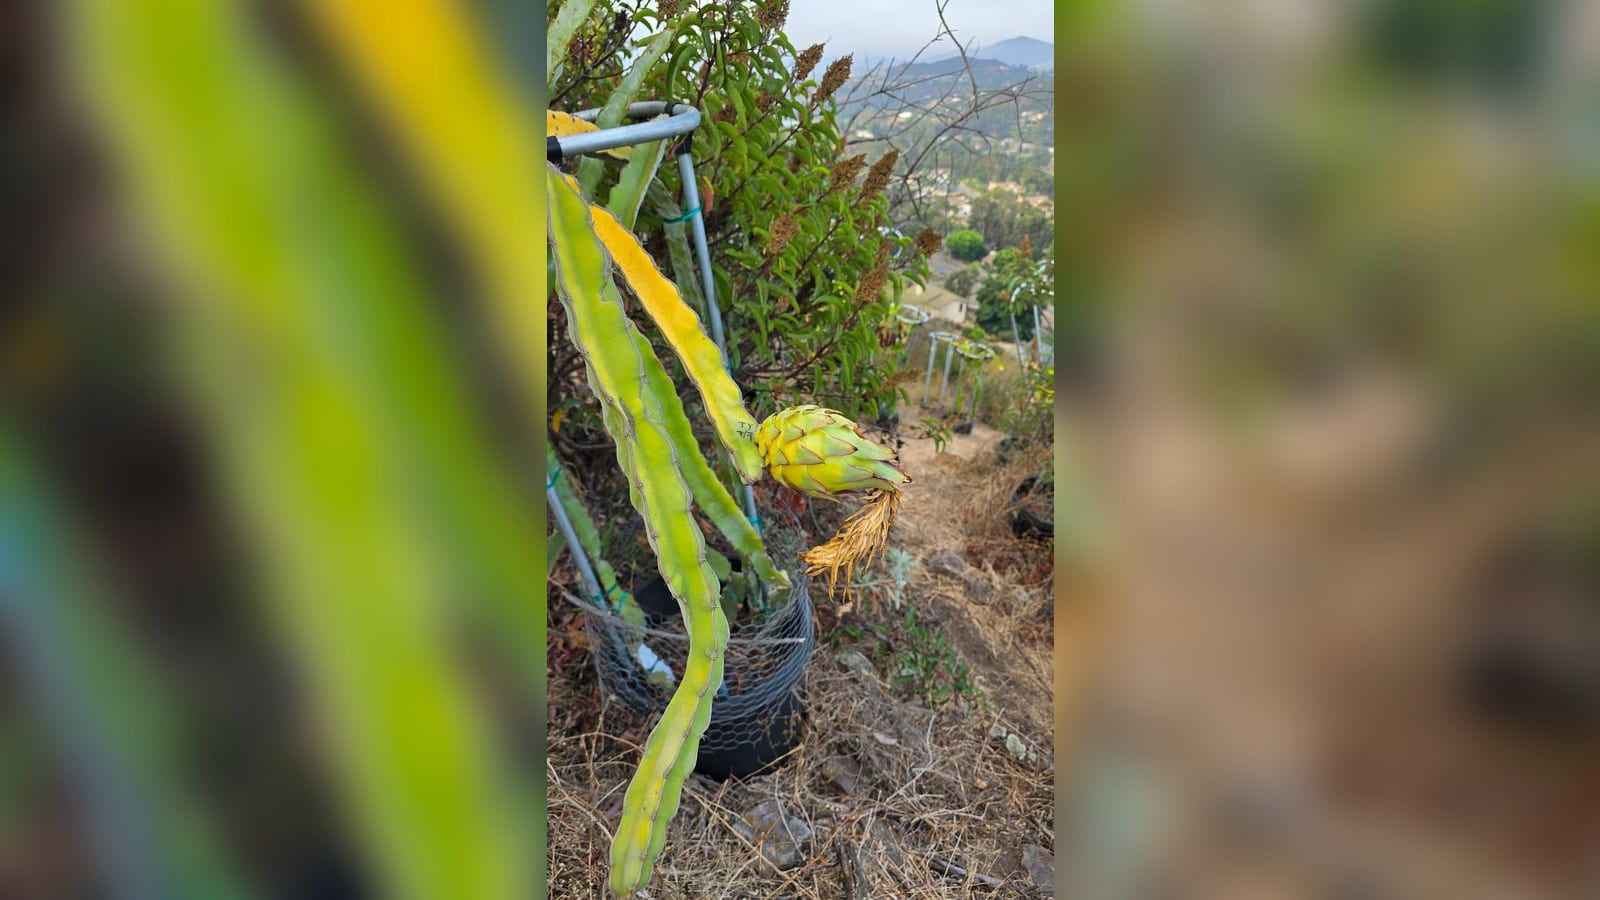
Rooting Physical Graffiti Dragon Fruit Cuttings
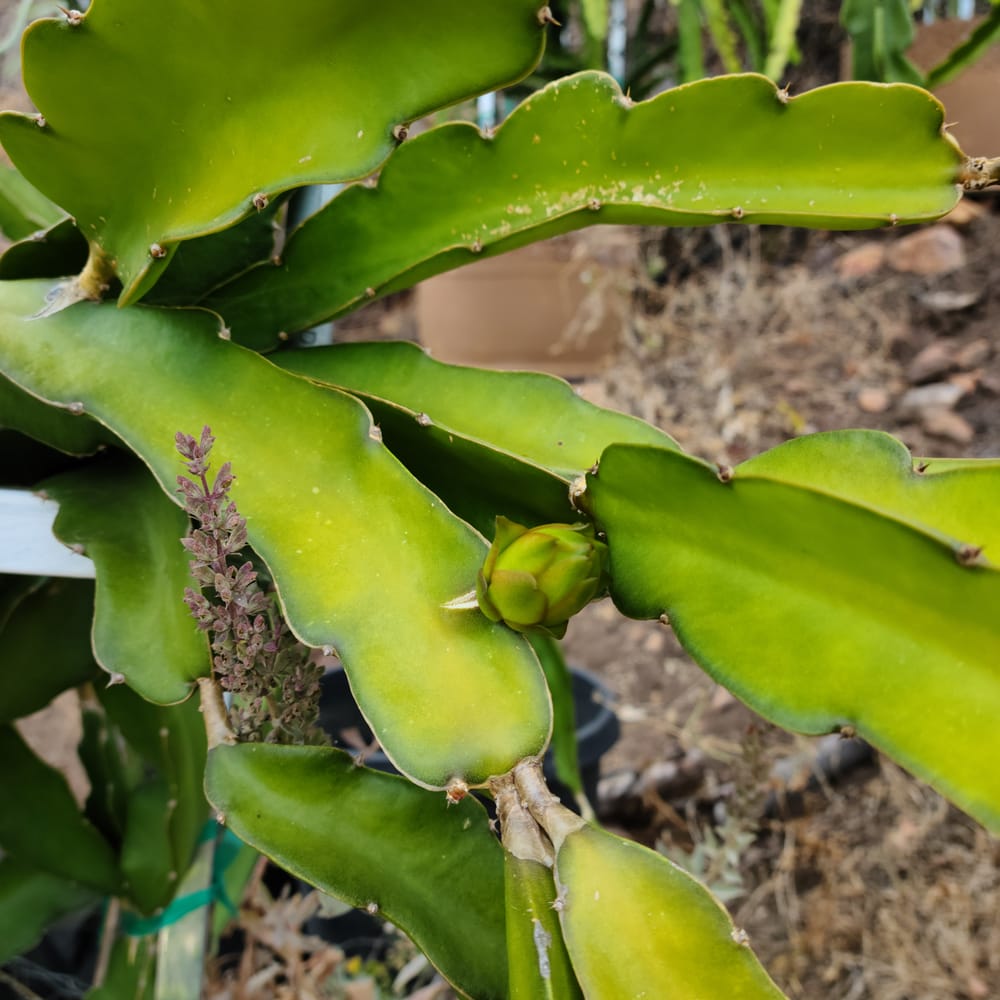
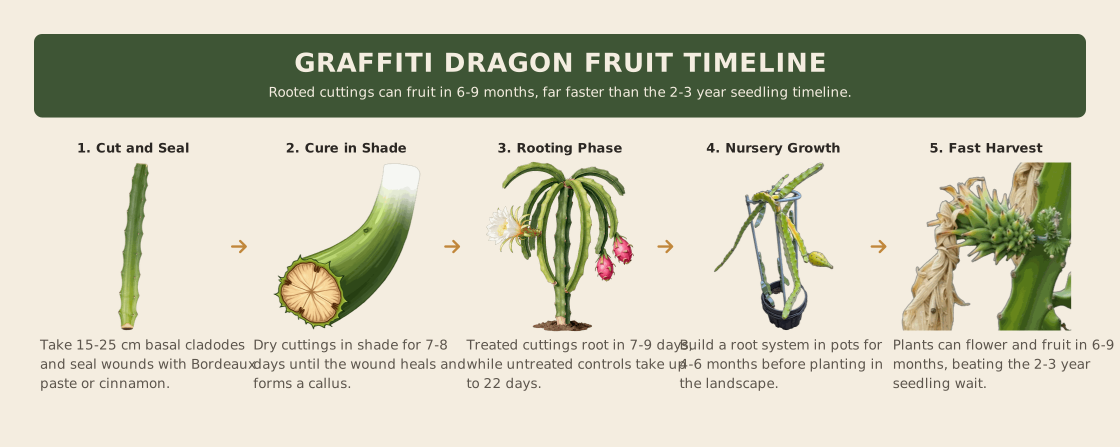
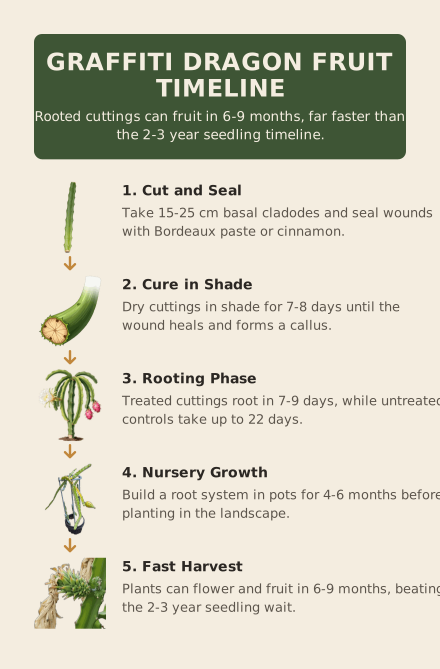
Root your Physical Graffiti dragon fruit cutting by curing the cut end for 7 to 8 days in dry shade, then planting the basal end about 2 inches deep in a gritty, free-draining mix. Keep the soil barely moist under bright filtered light. Expect initial roots within 2 to 4 weeks and a plantable root system in 4 to 6 months. This clone is self-sterile, so you must plant a compatible pollinator partner nearby to get fruit. For more details on the variety’s traits, read our Physical Graffiti variety spotlight.
Why a Cutting and Not a Seed
Dragon fruit seeds produce a genetic lottery. A seedling is a unique mix of its parents, meaning you cannot predict the fruit color, size, or flavor until the plant matures. Worse, that maturity takes time. Seed-grown pitaya can take up to 7 years to produce its first crop[2]. For a home grower wanting specific traits, waiting nearly a decade for a gamble is rarely worth it.
A cutting is a clone. It carries the exact DNA of the mother plant. When you root a Physical Graffiti cutting, you are guaranteed the same vigorous growth and floral characteristics as the source. This clone reaches trellis height quickly, with new stems growing up to about 1.2 inches (3 cm) per day[2]. Many plants produce fruit just 6 to 9 months after planting[2]. You get a known result in a fraction of the time.
| Propagation Method | Time to Fruit | Genetic Consistency |
|---|---|---|
| Seed | Up to 7 years | Variable (unknown traits) |
| Cutting | 6 to 9 months | Exact clone of mother |
Longer cladodes from mature plants root more reliably. They hold higher carbon-to-nitrogen ratios and more stored carbohydrates, which fuels root development and improves survival rates[1]. This energy reserve helps the cutting establish a strong root system faster than younger, thinner stems from the upper canopy.
The Hidden Risk: Disease Transmission
Vegetative propagation is efficient, but it copies everything from the mother plant, including pathogens. Uncertified cuttings traded between growers often spread disease silently[1]. No rooting hormone or soil mix can fix a plant that starts with a systemic infection. Source your cuttings from screened mother plants and always disinfect your cutting tools before making a cut. Hygiene matters more than any rooting trick.
Commercial nurseries favor cuttings because they are cheap, fast, and allow for annual batch production with little seasonal constraint[1]. The main risk to a buyer is not poor rooting, but unverified or infected material. Choose your source carefully to ensure your Physical Graffiti clone starts clean and grows true.
Step by Step: Cure, Cut, Plant
Select a basal cladode from the lower section of the mother plant. Look for dark green, tough segments rather than the light green, fleshy growth found in the upper canopy. Younger cuttings under one year old root poorly, while mature basal stems hold the carbohydrate reserves needed to fuel new root development[1]. Aim for a segment between 15 and 25 cm long. This size range offers the best balance of stored energy and manageable handling for home growers[1].
Make your cut where the cladode joins the woody stem of the parent plant. This insertion point is naturally tougher and less prone to immediate rot than cutting through succulent tissue. If you must cut through the fleshy part of the stem, protect the wound immediately. Apply Bordeaux paste or powdered cinnamon to the cut surface. Both substances are fungistatic and bacteriostatic, creating a barrier against pathogens like Xanthomonas and Erwinia that exploit open injuries[1].
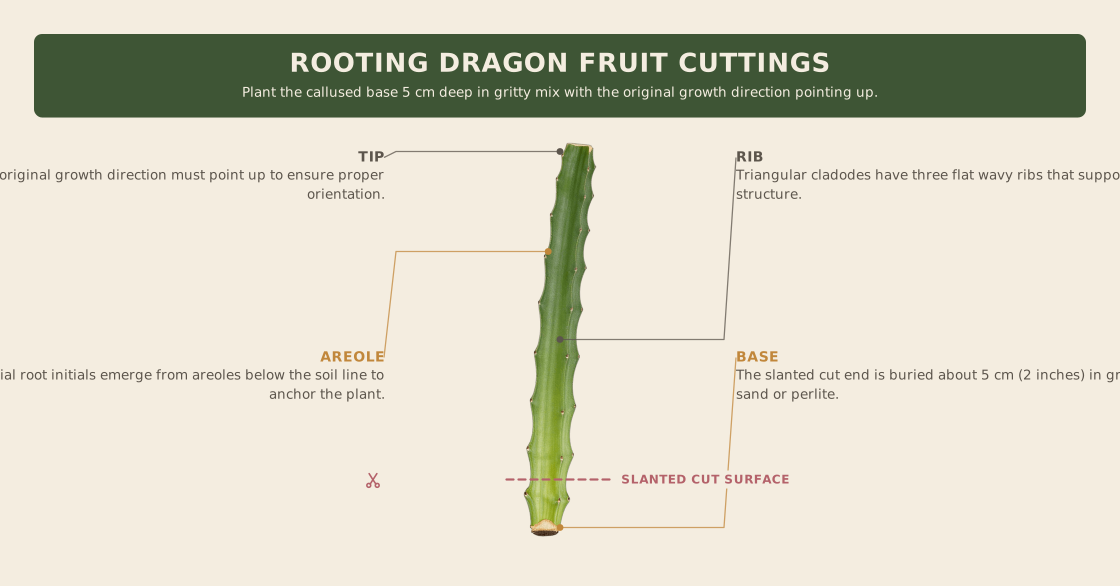
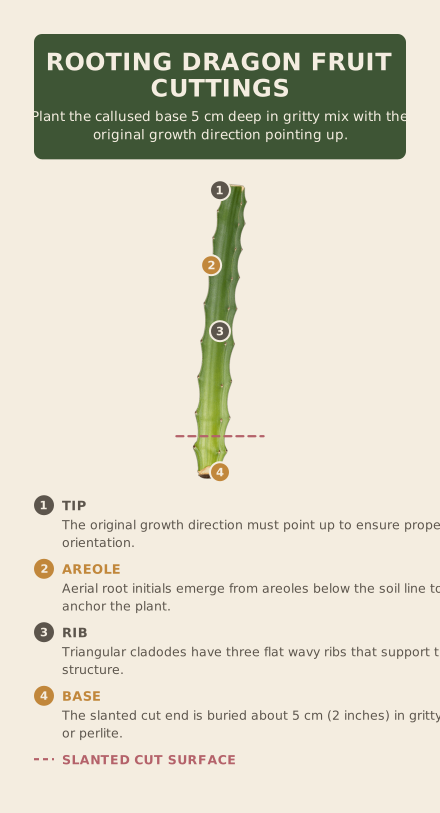
Prepare the base for planting by making a slanted cut at the very bottom of the cutting. This increases the surface area for root emergence. In some trials, growers trim the fleshy outer layer from the bottom 2 to 3 cm to expose the xylem. This step ensures the vascular tissue is accessible for water uptake and root initiation. After cutting, allow the wound to dry and heal. Place the cutting in a dry, shady location for 7 to 8 days. This curing period allows a waxy film to form over the wound, sealing it against soil-borne fungi[3].
You can plant the cured cutting directly into a gritty mix, or dip the base in a rooting hormone first. Pitaya roots readily in water alone, so hormone is not required for success. However, it significantly increases root mass and speed. If you choose to use a hormone, apply it after the curing period and just before planting.
Why use hormone? While a cutting will root without help, studies show that auxin treatments can increase average root length by up to 760% compared to water controls. This creates a more robust root system faster, giving the plant a head start on establishing itself in the soil.
| Hormone Type | Concentration & Duration | Primary Benefit |
|---|---|---|
| Potassium IBA (K-IBA) | 125 mg/L | Maximizes root length[3] |
| NAA | 400 mg/L | Improves root thickness and combined growth[3] |
| IBA (Liquid) | 10 mM, 10-second dip | 100% rooting rate and larger root systems[1] |
| IBA (Powder/Liquid) | 3000 mg/L, 20-second dip | Higher survival and better root quality at 60 days[4] |
Plant the basal end of the cutting about 5 cm (2 inches) deep into a well-drained substrate. A mix heavy in sand or perlite is ideal. These materials prevent waterlogging, which is the primary cause of rot in young cuttings. Some organic matter can be included to support subsequent growth, but the medium must remain airy. Keep the soil barely moist. Over-watering suffocates the developing roots and invites bacterial disease. Bright, filtered light is sufficient; avoid direct, harsh sun which can stress the unrooted stem.
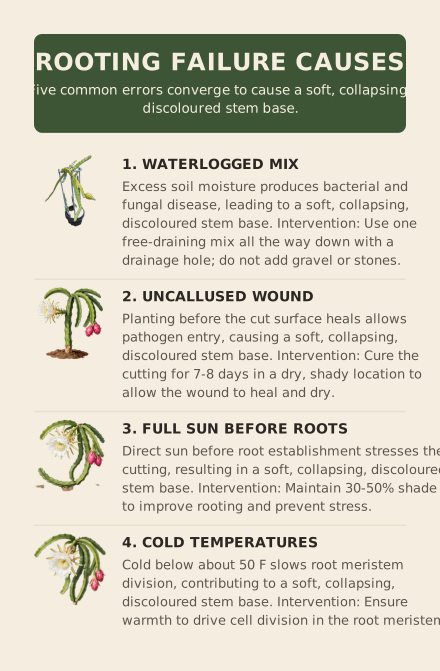
The Rot Window: Water, Light and Heat in Weeks 1-12
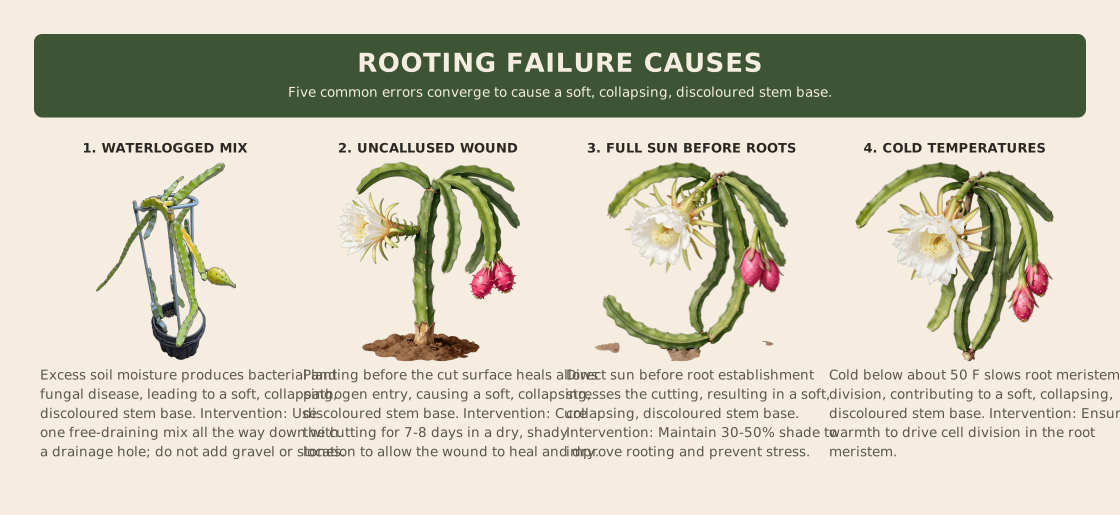
Most losses in the first three months are not due to a lack of rooting hormone. They are caused by over-watering and sunburn. Dragon fruit are CAM plants, meaning their stomata close during the day to conserve moisture. A cutting without a working root system cannot cool itself through transpiration. If you place a fresh cutting in full sun, it will scorch because it cannot manage heat stress. This thermal damage creates entry points for pathogens like Xanthomonas campestris and Erwinia carotovora, which cause soft stem rot[5].
Shade is your primary defense during this establishment phase. Aim for about 50% shade while the cutting is actively rooting. Once roots begin to form, reduce this to roughly 30% shade for the first 3 to 4 months[2]. This balance allows enough light for photosynthesis without overwhelming the plant’s limited water uptake capacity. Too much shade lowers production later, but too much sun now kills the clone.
Water management is equally critical. While pitayas are cacti and tolerate dry spells, they have a high water requirement for active growth. Excess soil moisture promotes bacterial and fungal disease. Keep the mix moist but never soggy. If the soil stays waterlogged, roots rot. Once roots are compromised, the plant tolerates drought poorly and sunburns more readily[5]. Check the top inch of the mix before watering. If it feels damp, wait.
Temperature drives the rooting process. Cell division in the root meristem slows in cold conditions and accelerates in warmth. The optimal growth range is 65 to 77 F (18 to 25 C)[2]. Spring and summer conditions naturally stimulate faster root development. If you are rooting in cooler weather, patience is required. The plant will not rot from cold alone, but it will not grow either. Keep it dry and warm until temperatures rise.
The Symptom Trap A soft, collapsing stem base looks like a single problem, but it has multiple causes. Waterlogging, an uncallused wound, intense sun, cold stress, and contaminated tools all lead to the same visual failure. Diagnose the cause by reviewing your last week of care, not just the current state of the stem.
Mapping Causes to Symptoms
| Cause | Mechanism | Prevention |
|---|---|---|
| Over-watering | Roots suffocate and rot; plant cannot take up water | Water only when top inch is dry; use gritty mix |
| Full Sun | Stomata closed; heat stress causes sunburn lesions | 50% shade during rooting; 30% shade for months 1-4 |
| Cold Temps | Root meristem activity stalls; plant cannot drink | Keep in 65-77 F range; avoid cold drafts |
| Open Wound | Pathogens enter before callus forms | Cure for 7-8 days; apply fungicide to cut |
Healthy roots and a callused wound are the first line of defense. If you see a soft base, check for these four factors immediately. Adjusting your shade cloth or watering schedule is often enough to save the cutting if caught early. For more details on the variety’s traits, read our Physical Graffiti variety spotlight.
Feeding and Potting On
Patience pays off in the first few weeks. Resist the urge to fertilize immediately after planting. UF/IFAS advises holding off on nutrients until about a month after planting or when you see clear signs of new growth[2]. Your cutting is running on stored carbohydrates from the mother plant. Adding fertilizer too early can burn the delicate new roots before they are established.
Once growth begins, switch to a light feeding schedule. For the first year, apply 0.25 lb (118 g) of a balanced formula like 6-6-6 or 8-4-12 per plant every two months[2]. As the plant matures into years two and three, increase this to 0.3-0.4 lb (136-182 g) per plant on the same bi-monthly cycle[2]. In year one, also work 4 lb (1.2 kg) of well-rotted manure or compost into the soil around the base[2]. Keep this organic matter off the stem itself to prevent rot.
Why wait? Fresh roots are sensitive. A month of dry, filtered light lets the vascular system connect before you add salts and nutrients.
After 4 to 6 months of rooting, your Physical Graffiti cutting is ready for its final home. You can move it into the ground or a larger container. Dragon fruit thrives in well-drained soil with a pH between 5.5 and 7.0[1]. If you are planting in the landscape, ensure the site has good drainage to avoid waterlogged roots, which invite bacterial and fungal issues.
Mulch is your ally for moisture retention and temperature control, but it must be applied correctly. Spread 2 to 6 inches (5 to 15 cm) of bark or wood chips around the plant[2]. Crucially, keep this mulch 8 to 12 inches (20 to 30 cm) away from the stem base[2]. Piling mulch against the cladode traps moisture against the tissue, creating a perfect environment for stem rot.
| Timeline | Action | Details |
|---|---|---|
| Month 1 | Wait | No fertilizer. Let roots establish. |
| Year 1 | Feed | 0.25 lb (118 g) 6-6-6/8-4-12 every 2 months. |
| Year 1 | Amend | 4 lb (1.2 kg) compost/manure around base (not on stem). |
| Months 4-6 | Transplant | Move to final pot or ground. pH 5.5-7.0. |
| Ongoing | Mulch | 2-6 inches deep. Keep 8-12 inches off stem. |
Proper feeding and potting on set the stage for vigorous growth. Physical Graffiti is a vigorous grower, and consistent nutrition will help it reach trellis height quickly. For more on what to expect from this variety’s growth habits, see our Physical Graffiti variety spotlight.
From Cutting to Trellis
Physical Graffiti is a vigorous climber that demands serious structural planning. A mature plant can carry several hundred pounds of stem weight, so your support system must be built for that load before the cutting even reaches the top[2]. Do not wait until the plant is heavy to install a sturdy post. Weak supports lead to snapped stems and lost harvests.
Keep the main support height at or below about 1.6 m (roughly 5 ft)[1]. This keeps pruning and harvest manageable without ladders. Single-post systems with a top ring are widely used and often yield higher fruit quality than sprawling trellis layouts[1]. If you use wire to connect posts or support the canopy, sleeve it with plastic hose. Bare wire cuts into the cladodes and invites infection[2].
Site selection matters. Plant your trellis 15-25 ft (4.5-6.1 m) away from trees, structures, and power lines to allow for the plant’s massive spread and weight[2].
Training the young plant is straightforward but requires discipline. Tie the main stem to the post as it grows. Rub out any lateral shoots that appear below the trellis height. This directs all energy into vertical growth. Once the stem reaches the top of the support, cut the tip. This forces the plant to branch out. Tie these new branches down over the support to form the canopy[2].
Pruning is not just for shape; it drives production. Prune one to three times a year to keep light and air moving through the canopy[2]. Pruning itself induces flowering and branching. Always treat fresh cuts with fungicide to reduce the risk of stem rot[2]. Because this clone grows fast, regular maintenance prevents the canopy from becoming a dense, unproductive thicket. For more on managing this variety’s specific growth habits, see our Physical Graffiti variety spotlight.
When It Fruits, and Why Your Pollinator Matters
You might hear that dragon fruit plants can produce a crop as soon as six to nine months after planting. That is the aggressive upper bound seen in commercial operations where conditions are perfect and plants are pushed hard. For a home grower starting from a cutting, expect a more realistic timeline of two to three years to first harvest. This delay allows the plant to build the massive stem structure needed to support heavy fruit loads.
Getting that first fruit depends entirely on pollination. Most cultivated pitaya genotypes suffer from self-incompatibility, meaning they cannot set fruit with their own pollen. This biological barrier is reinforced by herkogamy, a physical separation of more than two centimeters between the stigma and the anthers that prevents self-contact[1]. Compatibility is not a universal rule but a genotype-specific trait. In trials, some white-fleshed clones proved self-compatible while red-fleshed clones required manual cross-pollination to achieve 100% fruit set[6]. You cannot assume a single Physical Graffiti cutting will fruit alone. Plant a compatible partner nearby to ensure success.
Timing is critical when you hand pollinate. The window for optimal fruit set runs from four hours before to twelve hours after anthesis, which typically occurs when flowers open between 8:00 and 10:00 PM[6]. Pollination at the moment of anthesis yields the heaviest, most-seeded fruit. Viability drops sharply as time passes; pollen collected 24 hours later has only about 44 to 49% viability, and by 42 hours, it is nearly useless[6]. While some flowers stay open into the early morning and may attract bees, relying on natural vectors is risky. Hand pollination at night or early morning by transferring pollen or whole stamens from one flower to another is the standard practice[2].
Do not skimp on the effort. Fruit size tracks directly with the number of fertilized ovules. Insufficient pollination results in small, underdeveloped fruit even if the plant technically sets a crop[6]. A well-pollinated fruit will be large and uniform, reflecting the genetic potential of the Physical Graffiti variety. For step-by-step instructions on transferring pollen, consult our hand pollination guide.
FAQ
Growers often ask if they can root Physical Graffiti in water. You can, but it is rarely the best choice. The Hainan trial noted that water-only controls produced weaker root systems compared to those treated with growth regulators in substrate.[3] Transit roots formed in water are also fragile and prone to shock when moved to soil. Stick to the gritty, free-draining mix recommended in the variety spotlight for a stronger start.
Do you need a massive container to begin? No. A 1-gallon pot is workable for a fresh cutting. This size allows you to monitor moisture levels closely, which is critical in the first few months. Once the root system fills the pot, move it up to a larger container. Starting small prevents the soil from staying too wet around the base, a common cause of rot.
What about cold weather? Pitaya thrives in temperatures between 65 and 77 F.[2] It can handle heat up to about 100 F, but it is sensitive to cold. Exposure to temperatures below 31 F for long durations will damage the plant.[2] However, a brief light freeze is not a death sentence. The plant typically recovers rapidly from minor freezing injury if the core tissue remains intact. If you live in a frost-prone area, keep the pot movable so you can bring it inside or cover it during cold snaps.
Can you skip the pollinator? Not with this clone. Physical Graffiti is self-sterile. It will not set fruit on its own pollen. You must have a compatible partner nearby to transfer pollen. Without a cross-pollinator, you will get beautiful flowers but no fruit. Check the variety spotlight for recommended partner cultivars.
References
- Pitaya as a New Alternative Crop for Iberian Peninsula: Cultural Practices (review; propagation section synthesising refs including Marques et al. 2011 cladode size, Moreira et al. 2012, Andrade et al. 2007 curing, El Obeidy 2006 and Thayamini & Thiresh 2015 IBA), Plants (MDPI) / PMC12987216 (2026).
- Pitaya (Dragonfruit) Growing in the Florida Home Landscape, HS303 (Crane & Balerdi, UF/IFAS Extension), UF/IFAS Extension (2020).
- Screening of Plant Growth Regulators for Promoting Rooting of Pitaya Cuttings (Chonghao et al., Hainan University; NAA/IAA/K-IBA rates, rooting days, 760% root-length response), Plants (MDPI) / PMC13165443 (2026).
- Propagacao da Pitaya 'vermelha' por estaquia / Propagation of red pitaya (Hylocereus undatus) by cuttings (Bastos et al.; 15 and 25 cm cuttings, 3000 mg/L IBA 20 s dip), Ciencia e Agrotecnologia (SciELO Brasil) (2006).
- Pitahaya Diseases (James Downer, UC Cooperative Extension Ventura County, adapted from Gary Bender, UCCE San Diego County), UC Cooperative Extension / UC ANR (2016).
- Floral and pollination biology of dragon fruit reveals strategies for enhancing productivity through pollination management and reproductive window extension (Jadhav et al.; self-incompatibility by genotype, 4 h before to 12 h after anthesis pollination window, pollen viability decay), Scientific Reports (Nature) / PMC12552510 (2025).